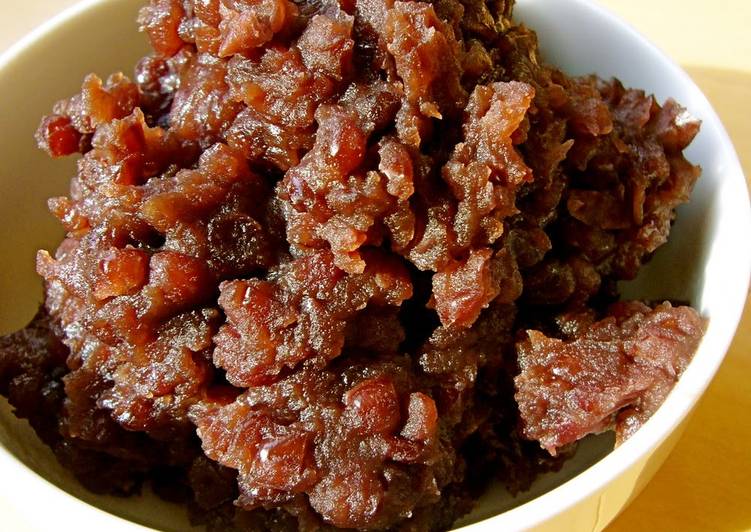
Hey everyone, I hope you’re having an incredible day today. Today, we’re going to make a special dish, homemade chunky red bed paste for ohagi and mochi. It is one of my favorites. For mine, I am going to make it a bit tasty. This is gonna smell and look delicious.
Homemade Chunky Red Bed Paste for Ohagi and Mochi is one of the most favored of recent trending meals in the world. It’s enjoyed by millions every day. It is simple, it is fast, it tastes yummy. They are nice and they look wonderful. Homemade Chunky Red Bed Paste for Ohagi and Mochi is something which I have loved my entire life.
To get started with this recipe, we must prepare a few components. You can have homemade chunky red bed paste for ohagi and mochi using 3 ingredients and 19 steps. Here is how you cook that.
The ingredients needed to make Homemade Chunky Red Bed Paste for Ohagi and Mochi:
- Prepare 300 grams Adzuki beans
- Take 300 grams Sugar
- Take 1/4 tsp Salt
Instructions to make Homemade Chunky Red Bed Paste for Ohagi and Mochi:
- Rinse the adzuki beans and soak in a pot with 3 cups of water. Bring to a boil over high heat, and then turn the heat down to medium. Simmer the beans for about 10 minutes.
- The beans will wrinkle gradually, and a brown scum will form on the surface.
- Add 2 cups of water to reduce the temperature of the cooking liquid.
- If you need to simmer the beans further, do over low heat. When the beans are plump without wrinkles and the cooking liquid is richly colored, turn off the heat.
- Drain the beans in a strainer. Gently stir the beans with your fingers while rinsing under running water. You want to rinse all the astringent cooking liquid away from the beans.
- Return the beans to the pot and add 3 cups of fresh water. Heat on high.
- When the beans have reached a boil, reduce the heat to low. In order to keep the beans from moving around, add an aluminum foil drop lid that is slightly larger than the mouth of the pot (press this down on the beans with the edges sticking up and it is easy to grab). Simmer for about 1 hour.
- The beans are finished when they easily pop when pressed between a pair of chopsticks, or between your fingers. Continue boiling until the liquid has reduced by half.
- Remove the drop lid, and add about 60 g (1/5 amount) of sugar to the surface, sprinkling it on with a wooden spatula. Replace the drop lid, and simmer without stirring for about 5 minutes.
- When the sugar has dissolved, repeat Step 9 twice. On the third time, increase the amount of sugar to about 90 g (1/2 recipe amount).
- After the sugar dissolves, add the remaining sugar and salt. Cover with the drop lid and continue to simmer the beans.
- When the beans have boiled down and achieved a glossy finish, remove the drop lid. Stir the beans with a wooden spatula, and continue to cook the beans as you further reduce the cooking liquid.
- When you can scrape the spatula across the bottom of the pot and you see the bottom, the anko is done.
- You can freeze the anko to store it. Divide into small portions, cover in plastic wrap, and store in a Ziplock bag. To use, defrost on a countertop or under running water.
- If you like the sweeter variety, use 250 g of adzuki beans, and increase the sugar to 350 g.
- For homemade ohagi, use the paste in.
- For homemade dorayaki, use this with - - https://cookpad.com/us/recipes/146495-dorayaki-with-pancake-mix-anko-and-butter
- How about as a crepe filling? - - https://cookpad.com/us/recipes/146478-easy-crepes-with-pancake-mix-in-a-frying-pan
- Try with chilled mizu-yokan? - - https://cookpad.com/us/recipes/146483-mizu-yokan-sweetened-and-jellied-bean-paste
So that’s going to wrap this up with this special food homemade chunky red bed paste for ohagi and mochi recipe. Thank you very much for reading. I’m confident you will make this at home. There’s gonna be more interesting food at home recipes coming up. Remember to bookmark this page in your browser, and share it to your loved ones, friends and colleague. Thank you for reading. Go on get cooking!